~ Cleaning, Stripping, Polishing, Preparing for Reassembly ~
Many parts were broken or damaged and all were repaired except the bent intake valve and the cracked valve guide.
Impossible repairs were made just to prove they could be, like the chain and the cam and the proof will be forthcoming
when the motor is run in. The black on the frame has a purple brass fleck under the clear and looks fab!
~~ See the bottom of this Gallery for Detailed Custom Tips ~~
 *** All Motorcycle Galleries *** beginning with 6 featuring 750cc Kawi Ninja Project Bike ***
GSX Before Pix  Vintage Kawi Repair  Ninja Reassembly  Paint and Fiberglass  Accessories and Other Kawi’s  Kawi History
2 Honda Project Bikes  Ariel  Vincent  Royal Enfield  Velocette  Norton  Hog (H.D.)  Custom and Show  Miscellaneous
~~~~~~~~~~~~~~~~~~~~~Hold Mouse over pix to read Title~~~Click to Enlarge~~~~~~~~~~~~~~~~~~~~~


Framewise I usually chop off all the non-cool stuff that you don’t really need like helmet locks, bungi clips and unnecessary tabs and that’s where the word ’chopper’ came from. Many will remove the center stand and even the sidestand but I happen to like both of them so I just body them out to smooth, beautiful pieces. The overall number of parts that get chucked is actually amazing when the job is over. I will show you a picture of the pile partway and in the end. All the rear bodywork I found distasteful, the tail lights, the stock signals, the chainguard, the stock mufflers, the seat, the rear fender, the tailpiece and all the tabs on the aluminum tailframe went in the trash heap and it might even save me an pound or two but that’s not the reason they got the axe. Customizing means making it personal, the way you like it, to your own custom and like that.
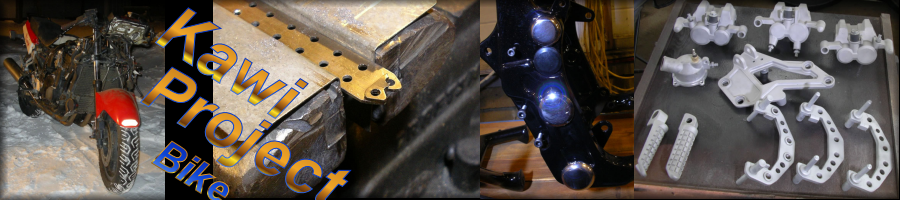
This gallery shows the story in pix of my attempt at welding a cast camshaft. Obviously it didn’t work and the cam even wound up breaking in another place so I just about gave up on the idea of being able to repair it. Then I got the idea that I could use torq pins or what I call split or spring pins to drive through a central shaft placed in the hollow of the cam. To locate the the shaft I made it octagon and bedded it in JB Weld (filled heat resistant epoxy) to get the alignment of the cam pieces right. Then I drilled through the cam and inner shaft in eight places and drove in the spring pins. Then I covered the broken areas with two feet of tightly wound 12oz fiberglass cloth saturated in polyester. Both the epoxy and the resin can stand short duration 400 degrees farenheight and a cam never gets much past 250f so it’ll hold. It’s easy enough for me to remove the valve cover and check on things so that’s what I’ll do.
The timing chain repair was another problem that almost failed due to using a metal that was way too hard and proved to be brittle. I had to make the outer link twice and wound up brazing it together onto the pins because the metal I used was probably a tad soft.
I found some nice stainless measuring spoons and creamers in the dollar store that had no writing on the bottom and were a real improvement over the stock chromed plastic ones. Also one was used to replace the washer around the ignition lock since it somehow got lost.
Don’t underestimate the value of paint that comes in spraycans. The Wrinkle Black is hard as nails and requires primer like all painted surfaces. Best to use commercial epoxy chromate primer on the frame and everywhere for that matter but small stuff can be sprayed with red, grey or black oxide primer from a can. The Black primer, Trim Black, Wrinkle Black and Gloss Black look good and compliment each other. Use a bit of all of them everywhere. I hate to use a trade name but Duplicolor has come out with some really fine colors and they are Wild!. The base coat or ground coat for the anodized colors is really good just by itself and is a very non-leafing silver. Don’t get too carried away using all sorts of colors all over the bike unless you happen to know bunches about color combinations and shades. Blue and red do not go good together as paints and the same with Green, and blue or red. It is possible to combine them but you really have to know what you’re doing. Best to use one accent color as an anodised highlight and I chose blue. You will also notice there is gold on the pedal mounts and rear sets and that’s OK because gold really isn’t a color (in my opinion) but combines best with blue anyway.
The last pix in this gallery shows my new assembly stand and it will be featured promenently in the next gallery as it brings the lower parts of the bike up to working level.
Painting the wheels was a trip and I wish I could get a better picture of the effect. They were polished on the rims and then masked, sprayed with black and then given a misting of coarse copper firemist powder before the clear was put on.
Bolts and nuts are a real problem. I replaced everything with allen heads where possible and painted the others with silver but really they need to be chromed or anodised. More on this when I figure it out.
 ~These Feature Galleries lead to other Sub-galleries~
The Gang  The Institute  Written Articles  Froggy & Cats  Eye Puzzlez  Web Design and The Old Page
Ruby’s Creative Arts  Ruby’s Garden  Ceramics  Decorator~Designs~Vessels  Studio  Kayaks & Trimaran
Norm’s Custom Shop  Digital Photo Gallery  Garage-Studio  Bicycles  Lotus  Motorcycles  Zdravko Z28
Email is to webmaster nsoar@tbaytel.net